OneNote is a Microsoft product intended to provide a platform for electronic notetaking. More accurately, perhaps, it provides a means of virtually organizing notes by class, section, and, if desired, note category. While it was developed for PCs as a desktop application, it has since been modified to fit the specifications for a personal tablet or mobile device. This Guide discusses some of OneNote’s basic functions on both a PC and the iPad.
OneNote on the PC
Since it is a Microsoft product, OneNote is best-used on a PC. The reason: On the PC, you have access to OneNote’s complete functionality.
Accessing Notebooks
If you already have a Notebook created, OneNote will open the most recently edited Notebook upon startup.
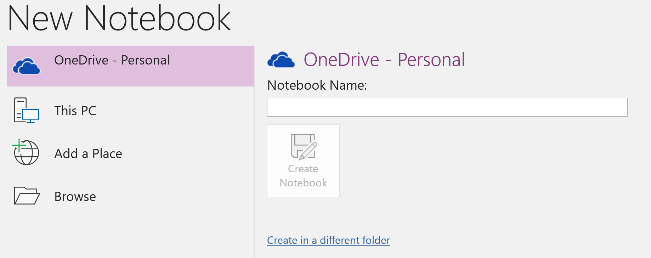
Creating a Notebook is easy:
- Select the File tab in the ribbon at the top of the screen.
- Select New.
- From here, you can choose where you would like to save the Notebook. If you intend to access OneNote using another device, it is recommended you save to OneDrive—Microsoft’s Cloud-based storage. Otherwise, you can save it to your PC in any desired location. Enter the desired Notebook name and select Create Notebook!
Creating Sections and Pages
We know OneNote strives to be a virtual organizer. As such, once you have created Notebooks, OneNote allows you to create Sections and Pages. Just as you might divide a 3- or 5-subject notebook into sections, so too can you divide your Notebooks in OneNote. Creating these Sections and the Pages within them is simple: Once you are in a Notebook, select the “+” button in the ribbon containing your Notebook title. This creates a new Section. To edit the name of the Section, double-click on the tab that is created and type a new name.
Once you have created a Section within your Notebook, you can add Pages to further organize your Sections. To do so, select the “+ Add Page” button on the right side of the screen. To edit the title of the page, simply type on the line at the top of the blank white sheet.
Customize the Appearance of your Notebooks
We all have our preferences—we know what works best for us and our notetaking needs.
You can change the color of your Page by visiting the Page Color button within the View tab of the top ribbon.
You can add a variety of lines to your Page by visiting the Rule Lines button within the View tab of the top ribbon.
Taking Notes with OneNote
Now that you have set up your Notebook, it is time to start using OneNote for notetaking. There are a few ways this can be done, depending upon the type of device you are using.
For a standard PC, you can type in OneNote as you would type in a typical Microsoft Word Document. In fact, most of the basic tools that exist in the Home tab of Microsoft Word also exist in OneNote including, but not limited to: Fonts, Bullets and Numbering, and Style Templates.
Unique to OneNote, and another indication of its power as an organizer, is the Tags tool found in the Home tab. This tool allows you to create, identify, and locate specific items within the notes you take according to their level of importance, their urgency, or simply their classification. You can customize tags to your liking as search for specific items by their tags. For example, if you cannot remember what assignments were given in your last class, search for your “To Do” tag, or perhaps your “Critical” or “Project A” tags.
Inserting Files, Audio, and Video
As classrooms become increasingly digital, so too become the resources provided for each lesson. OneNote offers a range of tools which help you annotate class handouts and slides, as well as capture everything that happens in class, regardless of how it is delivered.
Inserting Files
For years, professors have been using slide presentations and handouts to teach their courses. Now, rather than print out all of these files, annotate them, and find a way to organize hundreds of slides and sheets, OneNote allows you to upload printouts directly into your Pages.
In the Insert tab or the top ribbon, select the File Printout button. You will be prompted to select a file. Using this tool, you can upload and open any PowerPoint, PDF, Word Document, Excel Worksheet, and more right in your Page. What’s more, you can annotate it with text or handwriting, depending on your device.
Note: The File Attachment button works the same way as the attachment button in an email. It physically attaches a file to your Notebook but does not display any of the content. In fact, in order to display the content of an Attachment, you need to select the file, then create a File Printout. It is perhaps more efficient to skip the File Attachment step and jump right to the Printout for notetaking.
In addition to files, you can upload picture and videos to your Pages with the click of a button.
Recording Live Audio and Video
A feature unique to the PC version of OneNote is the recording functionality. To record audio, select the Record Audio button in the Insert tab.
While recording audio, you can continue to take notes on your Page. What’s more, OneNote will sync the audio with the notes you have taken. So, when you have stopped the recording, each item will display a Play Button to its left. Selecting this Play button will play the snippet of sounds being recording at the very moment you were typing, inserting, or writing the notes.
The Record Video functionality works similarly to Record Audio—the difference is, it’s video! Note: Most PCs only have a camera which points toward the user. Therefore, the Record Video may not necessarily be useful during class unless a video of yourself taking notes is what helps you study!
Handwriting Notes
Some prefer writing notes over typing notes, and OneNote provides that functionality. Within the Draw tab, you can select a variety of pen types, thicknesses, and colors.
Handwriting Recognition
Not only can you hand-write your notes in OneNote, but you can also convert your handwriting to typeset text and math. To do so:
- Write whatever your heart desires.
- Use the Lasso Select tool and encircle the content you wish to convert to text.
- Select either the Ink to Text or Ink to Math button, depending upon what you are trying to convert. In this example, we are using the Ink to Math button. The Ink to Text option works similarly.
- A dialogue box will open which allows you to preview and edit your selection to ensure an accurate translation. Select Insert and you handwriting will be converted! Note: The translation is not perfect, as there are variations in handwriting which can confused the translator. Editing within the dialogue box is a helpful way to avoid this mistranslation.
OneNote on the iPad and iPhone
Even though OneNote is a Microsoft product, it is still usable on the iPad and iPhone. That said, it does have more limited functionality. The following sections will discuss how to use OneNote on the iPad. The features are similar on the iPhone, but physically smaller and more limited.
Download the OneDrive application
OneDrive is another Microsoft application which allows you to save and access Notebooks with the Cloud. To make full use of this feature on your iPad or iPhone, you must install the OneDrive application, which can be done via the AppStore on your device. For more information on OneDrive, you can consult the Application Preview. It is strongly recommended that you download OneDrive prior to using OneNote. Installation will allow you to access the OneNote files you have created on any device with access to your Microsoft account. If you have a Microsoft account, you do not necessarily need to download OneDrive, but it is helpful.
Accessing a new Notebook
Accessing a new Notebook with OneNote on these Apple devices is simple. You have two ways of doing this:
Create a new Notebook
- Select the “+ Notebook” button at the bottom of the left ribbon
- The Create Notebook window will open. Enter your desired Notebook name, customize your Notebook color, and hit Create! Notice, the location is your OneDrive—this is why it is helpful to have OneDrive installed on your device.

Open more Notebooks using OneDrive
Once you have OneDrive installed, accessing more Notebooks is simple:
- Select More Notebooks in the left ribbon.
- The Open More Notebooks window will open. From there, you can select any of the Notebooks in your Personal OneDrive, or you can select the Open more from OneDrive button to access the OneDrive application on your device.
Creating Sections and Pages
We know OneNote strives to be a virtual organizer. As such, once you have created Notebooks, OneNote allows you to create Sections and Pages. Just as you might divide a 3- or 5-subject notebook into sections, so too can you divide your Notebooks in OneNote. Creating these Sections and the Pages within them is simple: Once you are in a Notebook, select the “+ Section” button to create a new Section and select the “+ Page” button to create a new Page within the selected Section.
Customizing Sections and Pages
Customizing the names of the Sections and Pages is easy as well: Simply hold you finger on the title you wish to edit until the Edit pane appears at the bottom of the screen. Select the Pencil icon to edit the Section or Page.
You can also delete Sections and Pages by selecting the Trashcan icon.
Customize the Appearance of your Notebooks
We all have our preferences—we know what works best for us and our notetaking needs.
You can change the color of your Page by visiting the Page Color button within the View tab of the top ribbon.
You can add a variety of lines to your Page by visiting the Paper Style button within the View tab of the top ribbon.
Taking Notes with OneNote
Now that you have set up your Notebook, it is time to start using OneNote for notetaking. There are a few ways this can be done, depending upon the type of device you are using.
On the iPad, you can type in OneNote as you would type in a typical Pages document, using a touch or Bluetooth keyboard. What’s more, a Microsoft-style ribbon of tools including, but not limited to Fonts, Bullets and Numbering, and Style Templates, is also available in the Home tab. Note: In the following example, the Sections and Pages ribbons have been collapsed.
Unique to OneNote, and another indication of its power as an organizer, is the Tags tool found in the Home tab. This tool allows you to create, identify, and locate specific items within the notes you take according to their level of importance, their urgency, or simply their classification. You can customize tags to your liking as search for specific items by their tags. For example, if you cannot remember what assignments were given in your last class, search for your “To Do” tag, or perhaps your “Critical” or “Project A” tags.
Inserting Files, Audio, and Video
As classrooms become increasingly digital, so too become the resources provided for each lesson. OneNote offers a range of tools which help you annotate class handouts and slides, as well as capture everything that happens in class, regardless of how it is delivered.
Inserting Files
For years, professors have been using slide presentations and handouts to teach their courses. Now, rather than print out all of these files, annotate them, and find a way to organize hundreds of slides and sheets, OneNote allows you to upload PDF versions of files directly into your Pages.
In the Insert tab or the top ribbon, select the PDF Printout button. You will be prompted to select a file from your device. What’s more, you can annotate it with text or handwriting, depending on your device.
In addition to files, you can upload picture and audio to your Pages with the click of a button.
Recording Live Audio and Video
Unfortunately, OneNote on the iPad does not currently support simultaneous recording and note taking.
Handwriting Notes
Some prefer writing notes over typing notes, and OneNote provides that functionality. Within the Draw tab, you can select a variety of pen types, thicknesses, and colors. Note: You have the option of drawing using the tip of your finger or a supported stylus. You can change the settings accordingly by selecting the Drawing Mode button.
Handwriting Recognition
Unfortunately, OneNote on the iPad does not currently support handwriting recognition.
OneNote on Mac
Even though OneNote is a Microsoft product, it is still usable on Macs. That said, it does have more limited functionality. The following sections will discuss how to use OneNote on the Mac.
Download the OneDrive application
OneDrive is another Microsoft application which allows you to save and access Notebooks with the Cloud. To make full use of this feature on your Mac, you must install the OneDrive application, which can be done via the AppStore on your device. For more information on OneDrive, you can consult the Application Preview. It is strongly recommended that you download OneDrive prior to using OneNote. Installation will allow you to access the OneNote files you have created on any device with access to your Microsoft account. If you have a Microsoft account, you do not necessarily need to download OneDrive, but it is helpful.
Accessing a new Notebook
Accessing a new Notebook with OneNote on your Mac is simple. You have two ways of doing this:
Create a new Notebook
- Select the “+ Notebook” button at the bottom of the left ribbon
- The Create Notebook window will open. Enter your desired Notebook name, customize your Notebook color, and hit Create! Notice, the location is your OneDrive—this is why it is helpful to have OneDrive installed on your device.

Open more Notebooks using OneDrive
Once you have OneDrive installed, accessing more Notebooks is simple:
- Select More Notebooks in the left ribbon.
- The Recent Notebooks window will open. From there, you can select any of the Notebooks in your Personal OneDrive. Note: This screen can also be accessed by selecting the Recent button on the left ribbon of the Create Notebook window.

Creating Sections and Pages
We know OneNote strives to be a virtual organizer. As such, once you have created Notebooks, OneNote allows you to create Sections and Pages. Just as you might divide a 3- or 5-subject notebook into sections, so too can you divide your Notebooks in OneNote. Creating these Sections and the Pages within them is simple: Once you are in a Notebook, select the “+ Section” button to create a new Section and select the “+ Page” button to create a new Page within the selected Section.
Customizing Sections and Pages
Customizing the names of the Sections and Pages is easy as well: Double click on the name of section or page to edit!
Customize the Appearance of your Notebooks
We all have our preferences—we know what works best for us and our notetaking needs.
You can change the color of your Page by visiting the Paper Color button within the View tab of the top ribbon.
You can add a variety of lines to your Page by visiting the Paper Style button within the View tab of the top ribbon.
Taking Notes with OneNote
Now that you have set up your Notebook, it is time to start using OneNote for notetaking. There are a few ways this can be done, depending upon the type of device you are using.
On the Mac, you can type in OneNote as you would type in a typical Word document for Mac. What’s more, a Microsoft-style ribbon of tools including, but not limited to Fonts, Bullets and Numbering, and Style Templates, is also available in the Home tab. Note: In the following example, the Notebook ribbon has been collapsed.
Unique to OneNote, and another indication of its power as an organizer, is the Tags tool found in the Home tab. This tool allows you to create, identify, and locate specific items within the notes you take according to their level of importance, their urgency, or simply their classification. You can customize tags to your liking as search for specific items by their tags. For example, if you cannot remember what assignments were given in your last class, search for your “To Do” tag, or perhaps your “Critical” or “Project A” tags.
Inserting Files, Audio, and Video
As classrooms become increasingly digital, so too become the resources provided for each lesson. OneNote offers a range of tools which help you annotate class handouts and slides, as well as capture everything that happens in class, regardless of how it is delivered.
Inserting Files
For years, professors have been using slide presentations and handouts to teach their courses. Now, rather than print out all of these files, annotate them, and find a way to organize hundreds of slides and sheets, OneNote allows you to upload PDF versions of files directly into your Pages.
In the Insert tab or the top ribbon, select the PDF Printout button. You will be prompted to select a file from your device. What’s more, you can annotate it with text or handwriting, depending on your device.
In addition to files, you can upload picture and audio to your Pages with the click of a button.
Recording Live Audio and Video
To record audio, select the Record Audio button in the Insert tab.
While recording audio, you can continue to take notes on your Page. What’s more, OneNote will sync the audio with the notes you have taken. So, when you have stopped the recording, each item will display a Play Button to its left. Selecting this Play button will play the snippet of sounds being recording at the very moment you were typing, inserting, or writing the notes.
Unfortunately, OneNote on the Mac does not currently support video recording.
Handwriting Notes
Some prefer writing notes over typing notes, and OneNote provides that functionality. Within the Draw tab, you can select a variety of pen types, thicknesses, and colors.
Handwriting Recognition
Unfortunately, OneNote on the Mac does not currently support handwriting recognition.